THE KING OF THE MONSTERS
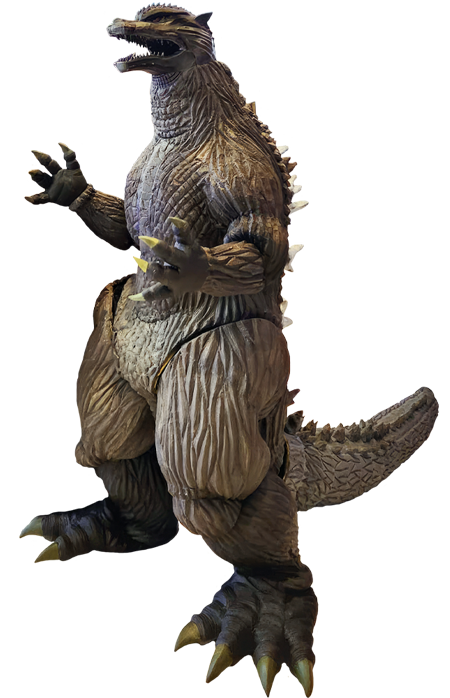
Napat Srisamer's Godzilla
Final Wars has become one of my favorite Godzilla movies and I've watched it many times. It was also the Godzilla movie that introduced me to other Kaiju and my favorite Godzilla design. Even after I grew up and got to know Godzilla movies in the Heisei and Millennium eras I still always loved the Final Wars' design.
As I got older, I became a Prop Maker and Cosplayer from my love of Tokusatsu but I never dared to make a Godzilla costume because of my own insecurities. For my final university project in 2023 I created a monster costume and in doing so met many people, including Sean Sumagaysay. Through that experience I started to gain confidence and finally decided to create a Godzilla costume, this is that story.
– Napat Srisamer
BUILDING THE COSTUME
Click the thumbnail image for the larger view and read the descriptions to learn more… enjoy!
CONSTRUCTION
Body
After completing the template Then draw it on the sponge. Cut and assemble just like you would assemble a Lego or a Gundam. A good structure will make the work look better. At this stage, once the frame is assembled, I will start drawing the texture and doing the texture at the same time. After that, use a No blade to cut the texture. The longest time, this set took 3 months to make. Just doing the texture took 1 month. And this set can separate the legs, feet and arms. For ease of moving For this step, I will use a 1 inch sponge for everything. To make the costume light and easy to move.
CONSTRUCTION
Hands and Feet
For the hands and feet I also used a pattern. To save time because time is quite limited. I decided to have my fingernails and toenails all sponge. At first I wanted to sculpt it but thought about the possibility of my nails kicking or hitting something and getting damaged. So I used a sponge because it was easier, lighter, and safer for the costume and the people around me, and cut 3 sheets of 10cm thick Eva Foam and glued them under my feet so that I could walk on rough surfaces without my feet breaking. The shoe is then placed in Godzilla’s foot and the shoe screws are shot through Godzilla’s foot, reaching Eva Foam for strength
CONSTRUCTION
Head
My first plan was to 3D print Godzilla’s head and sculpt it further to create the texture of the head and cast it in latex. This will make me can add a jaw movement mechanism and lights that can be turned on and off by the user inside to make it look like it can uses Atomic Breath, and all the mechanisms I have already designed. But with very limited time This required me to use the printed head and glue it to the body in order to finish the head in time. The mechanism I designed will then be used in the next Godzilla suit.
CONSTRUCTION
Dorsal Plates
Like fingernails and toenails. I use a sponge to do this as well. For safety and light weight I used 1 inch and 2 inch thick sponges and only the thickness of Dorsal. Then cut it little by little with a cutter and when finished, take it and arrange it into the desired shape. Then put it back together with the back piece.
CONSTRUCTION
Tail
The first step was to cut the thickness and amount of sponge along the segments of Godzilla’s tail. Drilled holes in each segment to make it lighter and inserted a Vacuum Tube as the center to connect all the parts together, then covered it with Lycra cloth. Use half an inch of sponge to wrap around the cut segments and create the same texture as when making the body. There’s nothing complicated about the tail because the process is similar to the body.
CONSTRUCTION
Skinning
For this step, I mixed a special latex recipe that I had studied. It may not be as good as the grade latex sold for making latex masks. But it is a more economical and better option for me. I had to assemble almost every piece and apply latex to the entire kit. Apply about 5-6 layers. I mixed the color into the latex to make it easier to paint. Once all the paint was applied, rubber paint was applied to the kit before it was finished with silicone spray. Silicone spray will enhance the color and prevent chafing of the outfit. This is finished.
FINISHED COSTUME
I spent more that 6 months studying and trying to figure out the techniques for making my own Godzilla suit. It’s really tiring but I’m proud of it too! This costume was also used to promote the movie Godzilla X Kong in my country, but of course it won’t end here. I still have a lot of things to work on including goals like bringing it to the World Cosplay Summit and making more Godzilla costumes and other villains in the franchise. And it will definitely be applied to a new Godzilla suit soon in the future.

Links
Contact
Have you already completed your own Godzilla costume and want to feature it here? Then by all means contact me and we’ll work together to add your costuming experience to this site.
